Tag: riser

Stair Planning Redux

Almost exactly a year ago I spent some time working out where the stairs would go and how exactly they would be configured. This was because the original design work I did had overlooked some issues that the architect caught, but in so doing he caused a lot of other problems. For example, in the approved drawings we have there’s only 5′ 10″ of headroom on the first floor landing. So I recalculated everything last year and had worked out a plan that was pretty good. I used that plan to position and size the basement stair opening.

However, since then I have leveled the first floor subfloor, which means the height from the first floor to the second is slightly different than it was when I made my calculations. Not only that, but if I plan to level the second floor as well I need to consider its height when it’s done rather than its height now.

Stair Planning

Stair planning with minimum required headroom

Another factor is that I read up on load and span limits for the stair stringers. Since the opening for the basement stairs prevents me from having any intermediate support for the first floor stairs, they need to be able to span the whole distance to the first landing, which is nearly ten feet. That means I need to use 1 ¾” x 14″ thick, 1.55E stringers, which are bigger than I planned. That affects the headroom in the landing going down to the basement. Finally, the rise for each step must be equal and no more than 7¾”. The current rise floor-to-floor  averages about 10’11” (131″). I can’t fit more than 17 steps, so the closest rise match is 7 ¾” for a total rise of 131 ¾”. I guess I’ll just level the second floor to that height.

So, I went back to my model in Sketchup and started re-working the plans. I got a bit frustrated because I was spending a lot of time drawing things out just to figure out it wouldn’t work. I finally realized I need to draw the required headroom and clearance, so I could see how much space I needed.
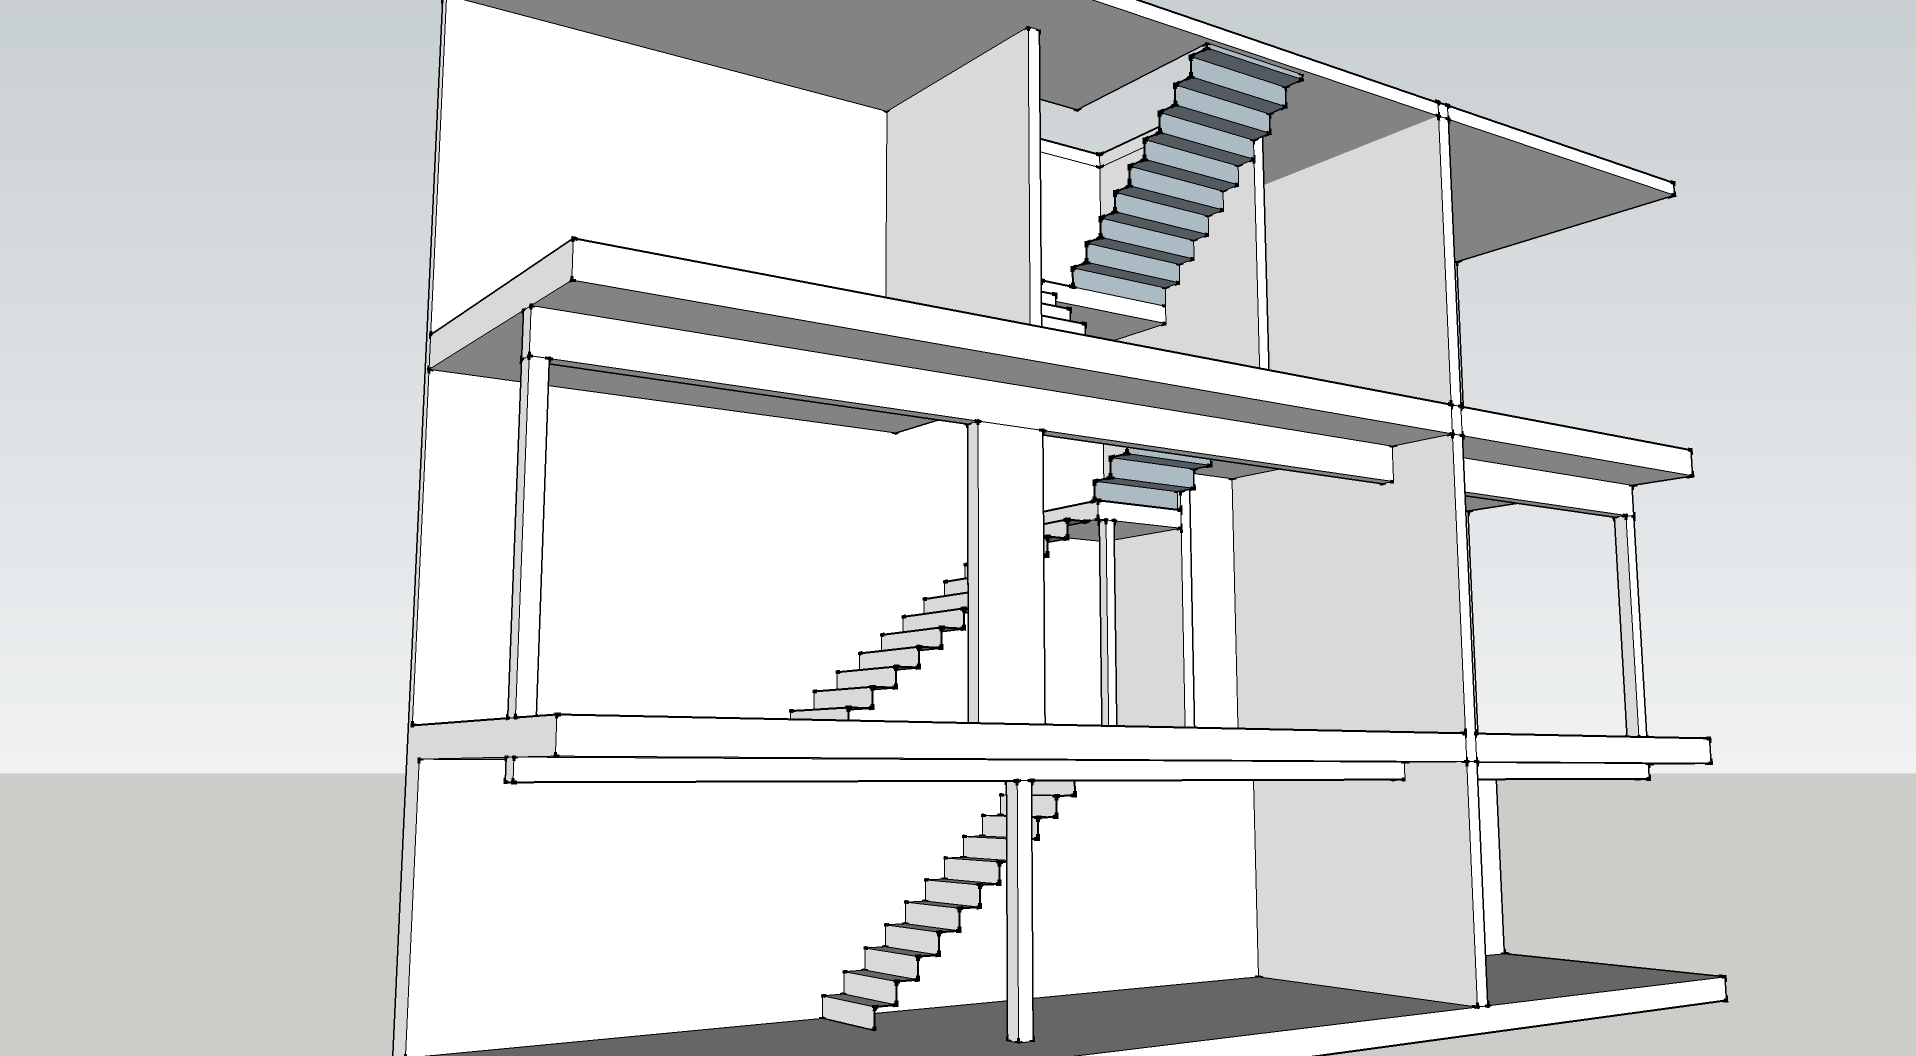
Second floor stairs

Second floor stairs

Once I did that, it started to come together. It’s a tight fit between the multiple stories, roof slope, and other available space restrictions. There are a couple of things that are less than ideal. In the picture above you can see that the second floor landing will need to be notched so there’s enough headroom coming up from the first floor, but structurally it will be fine. There’s also the roof pitch clipping a triangle of headroom above that landing, and the stringers which are notched onto the edge of the landings rather than completely on top to provide enough space to meet code.

The good news is that I can figure this out on the computer and that it will all meet code requirements and I should be able to get a queen-size mattress up the stairs (and not bonk my head on the underside of the landing). Now I can get my LSL stringers on order and start framing the first floor landing.

Stair Planning

We’ve got two parallel tracks for the next little while: framing the first floor and the mechanical room plumbing. For now I’m working on the framing. My friend Matt B. will be down tomorrow and Friday to help work on the house, so we’ll be tackling the opening for the stairs in the first floor. In order to be ready I had to go back over the stair calculations, re-measure everything and come up with the final plan and position of the stairs. The stairs are extremely complicated because everything has ripple effects and there are some tight constraints.

Stair Planning

Stair planning

For example, the first floor stairs will go straight up to a landing, turn right 90° and go up the remainder. The bottom of that landing needs to be more than 80″ above the floor so that we can put the stairs down to the basement underneath it. The stairs from the second floor to the attic are above the first floor stairs. Those stairs have a landing directly above the first floor stair landing. We need at least 80″ from the top of the first floor landing to the bottom of the second floor landing plus another 80″ from the top of that landing up to the roofline, and there needs to be a consistent rise and run to the stairs to allow them to get to the correct height at the correct place.

To further complicate things, the brick foundation is thicker than the frame walls, so the finished first floor wall will be 9″ from the finished basement wall. In order to have the minimum 36″ stair width going down to the basement, the stairs above them must be wider, which means the landing must be wider and deeper, and the stairs from the landing to the second floor have that much less space to go up the remaining distance because they can’t go through the LVL beam we just put in. Despite all of that, we did have some play in where the stairs could go front-to-back. Moving them back makes the front bedroom on the second floor bigger, but the coat closet, pantry, and walk-in closet in the master suite smaller. We eventually figured it out.

First floor stair opening

First floor stair opening

Despite the stick drawing of the stairs, I did account for the head room under the stairs after stringers and drywall. Everything checks out, but it’s very close to the 6′ 8″ minimum height. I’d really like to have more clearance, not just for tall people but for moving furniture, but unfortunately there’s no good way to fit more in without building a dormer in the attic above the stairwell, something we really don’t want to do.

The stairs from the first floor to the second will be 42″ wide with 11″ treads (including a 1″ bullnose). From the floor to the landing they’ll rise 7 ⅝” per step, and from the landing to the second floor they’ll rise 8″. The stairs to the attic and basement will have an 8″ rise and a 10″ tread. We’ll build the stairs from framing lumber (rimboard for the stringers, OSB for the risers and treads), and eventually cover them with finishing treads and risers that match our floors.