Month: May 2013

Basement Stair Opening

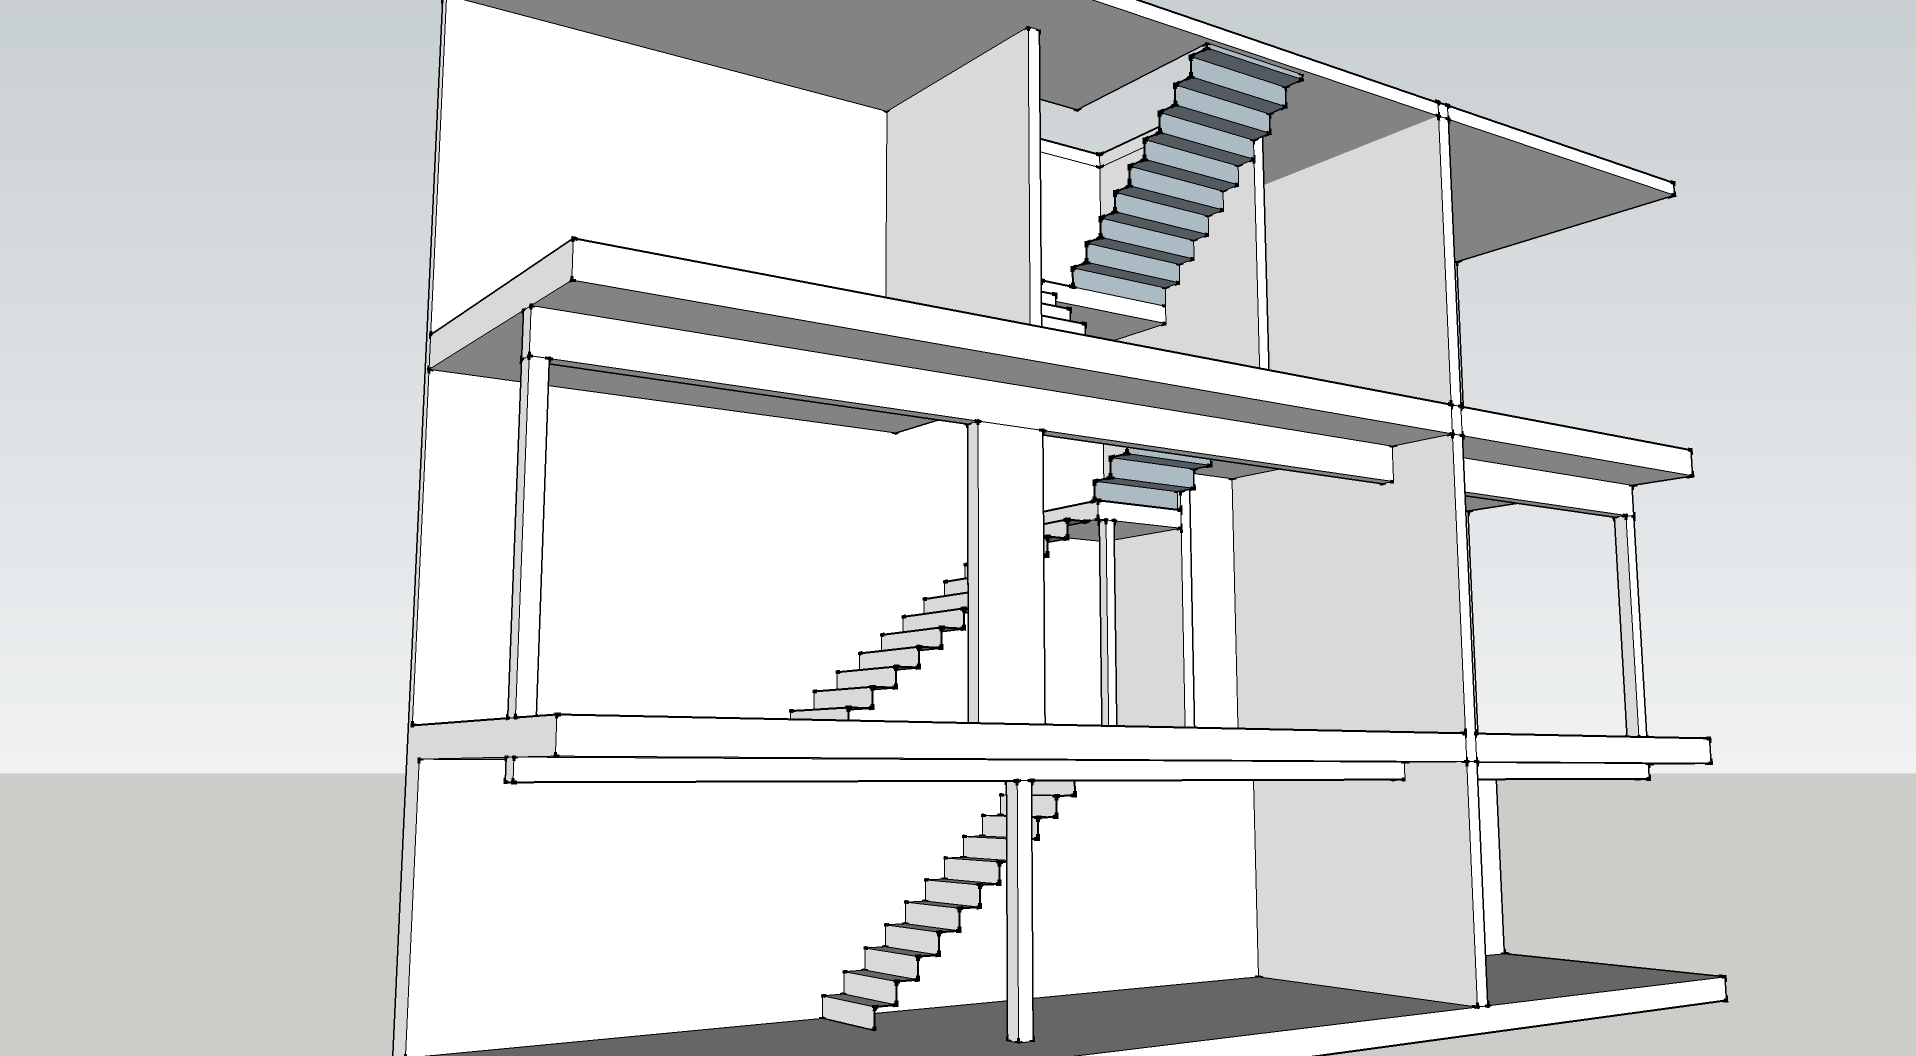
We’re probably not going to have a finished basement for a long time. When we do finish the basement we’re going to lower the basement floor in order to gain some additional headroom. That will be after we finish the first floor, the second floor, and the outside. In short, we probably won’t have stairs going down into the basement for years. However, we do need to frame out the opening for the eventual stairs in order to finish the first floor. This is just one small piece of the massive 3D jigsaw puzzle we’re working on. Framing the opening for the stairs comes before we put down new subfloor comes before we build a stair landing comes before we build new stairs to the second floor.

Original opening

Original opening

My friend Matt B offered to spend a couple days of his week off down from Milwaukee to work on our house, so I wanted to tackle a two-person project and with the beam mostly done it seemed as good a time as any to start framing the first floor. I finished the stair planning so I knew where we were putting things and I picked up the necessary lumber and some joist hangers. The floor is framed with 2x10s that span the width of the house. Four had been cut at some point to make an access door down to the basement that had then been covered over with hardwood floor. The hole wasn’t properly reinforced and the joists were patched with 2x4s to provide a nailing edge for drywall in the basement.

Floorboards removed

Floorboards removed

We removed the 2x4s and cut back the floorboards where we’d be working. Since the new stairs are further back in the house, the cut joists only partially coincided with the joists that needed to be cut for the new opening. To conserve lumber we did a swap, cutting the joists back to the beam and replacing the cut joists with full pieces and vice-versa. We used mending straps to join together the cut joists at the beam.

Mending straps

Mending straps

At the ends of the opening we doubled up the joists, gluing together the 2x10s and putting in two rows of screws every 12″. We had to remove the top courses of brick to expose the 6×8 wood sill on top of the foundation. The joists were notched into the sill, so we had to enlarge the notches to fit the doubled joists. Once the ends were in place we attached joist hangers and dropped in the doubled up joist along the length of the opening. This was glued and screwed the same way as the ends.
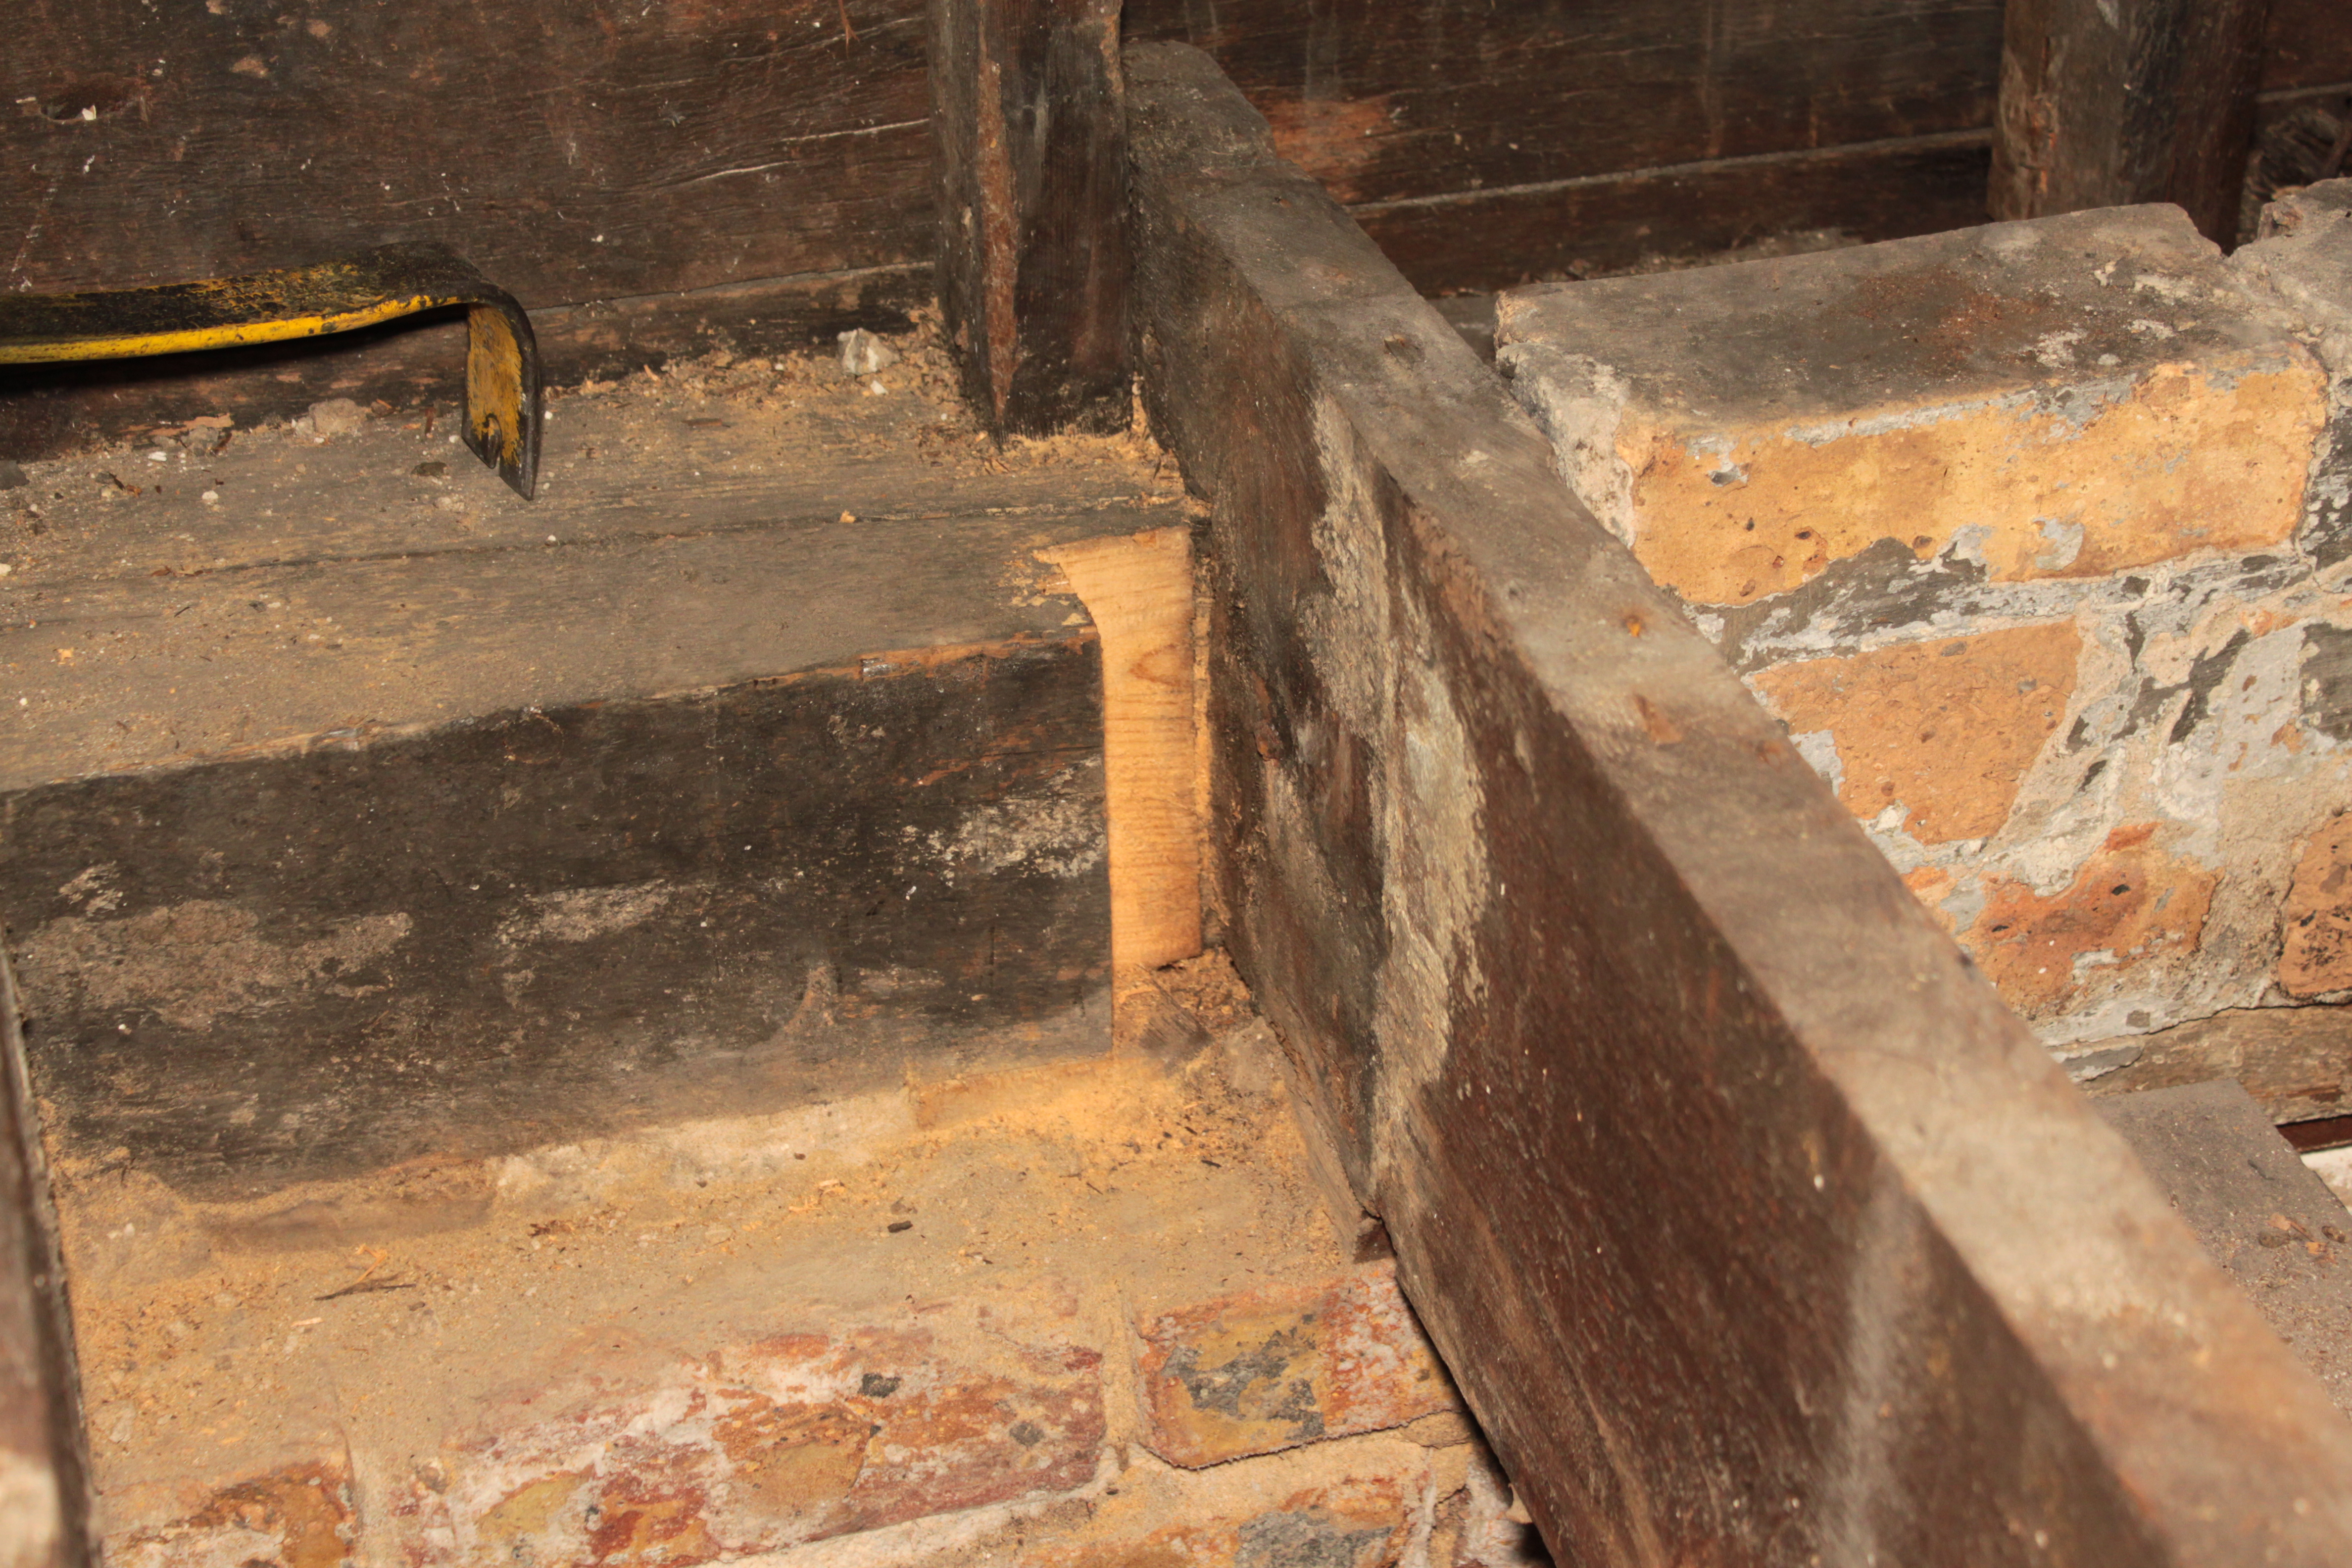
Notched rim board

Notched rim board

At this point we ran into trouble with the joist hangers. The existing 2×10 floor joists are rough-sawn, meaning they are much thicker than the “nominal” 2x10s they make today. Joist hangers are designed to accommodate the 1½” modern 2x10s. It turns out they make joist hangers for rough-sawn 2x10s, but I didn’t know that when I first exchanged the hangers for LVL hangers only to discover they were now too tall, then exchanged them back for the original hangers and bent them into shape with a hammer. Oh well, they’re installed and not going anywhere. The new structure is very solid, though I still need to repair the brick between the joists.

Hangers installed

Hangers installed

In order to get everything straight I used a jack post in the basement to push the joists into position before installing the hangers. I’ll still have a lot of shimming to get the subfloor level thanks to the wonky nature of the joists, but everything here is straight. Thanks to Matt B for all his assistance!

First Floor Beam: Column Bases

After I got the beam up, I left the temporary wall in place because I hadn’t anchored the bases of the columns. The two outside columns at the front and back sit on a large wood 6×8 sill that sits on top of the brick foundation. I installed holddowns on either side of the columns that were anchored through the wood and into the brick with sleeve anchors.

Hold-down bracket

Hold-down bracket

The middle two columns sit on the steel beam in the basement, directly above the steel columns, thus carrying the weight of the house straight down to the footings. To attach the columns I put angle brackets to either side with a bolt through the column. Dean and his dad came over on Wednesday evening and welded the brackets to the steel beam.

Dean welding

Dean welding

I ran into some difficulty getting the holes drilled for the bolts because the hole is positioned at roughly the same height as the top of the floor joists. The drill couldn’t go in straight, so the holes kept going at an angle. I finally managed to get the hole drilled by using the drill bit with a socket wrench and then pounding the bolt through with a hammer.

Welded column base

Welded column base

With everything secured in place, I no longer have to worry about anything knocking the columns out of place. Last night I took down the rest of the temporary wall that ran parallel to the beam. For the first time we got a look at our first floor opened up, with the exception of the chimney (that will come later).

First floor opened up

First floor opened up

You can also see the stair opening that Matt B and I worked on last week. I’ll have a separate post about that once I finish some remaining items on that project. A big thanks to Dean for welding the brackets!

Stair Planning

We’ve got two parallel tracks for the next little while: framing the first floor and the mechanical room plumbing. For now I’m working on the framing. My friend Matt B. will be down tomorrow and Friday to help work on the house, so we’ll be tackling the opening for the stairs in the first floor. In order to be ready I had to go back over the stair calculations, re-measure everything and come up with the final plan and position of the stairs. The stairs are extremely complicated because everything has ripple effects and there are some tight constraints.

Stair Planning

Stair planning

For example, the first floor stairs will go straight up to a landing, turn right 90° and go up the remainder. The bottom of that landing needs to be more than 80″ above the floor so that we can put the stairs down to the basement underneath it. The stairs from the second floor to the attic are above the first floor stairs. Those stairs have a landing directly above the first floor stair landing. We need at least 80″ from the top of the first floor landing to the bottom of the second floor landing plus another 80″ from the top of that landing up to the roofline, and there needs to be a consistent rise and run to the stairs to allow them to get to the correct height at the correct place.

To further complicate things, the brick foundation is thicker than the frame walls, so the finished first floor wall will be 9″ from the finished basement wall. In order to have the minimum 36″ stair width going down to the basement, the stairs above them must be wider, which means the landing must be wider and deeper, and the stairs from the landing to the second floor have that much less space to go up the remaining distance because they can’t go through the LVL beam we just put in. Despite all of that, we did have some play in where the stairs could go front-to-back. Moving them back makes the front bedroom on the second floor bigger, but the coat closet, pantry, and walk-in closet in the master suite smaller. We eventually figured it out.

First floor stair opening

First floor stair opening

Despite the stick drawing of the stairs, I did account for the head room under the stairs after stringers and drywall. Everything checks out, but it’s very close to the 6′ 8″ minimum height. I’d really like to have more clearance, not just for tall people but for moving furniture, but unfortunately there’s no good way to fit more in without building a dormer in the attic above the stairwell, something we really don’t want to do.

The stairs from the first floor to the second will be 42″ wide with 11″ treads (including a 1″ bullnose). From the floor to the landing they’ll rise 7 ⅝” per step, and from the landing to the second floor they’ll rise 8″. The stairs to the attic and basement will have an 8″ rise and a 10″ tread. We’ll build the stairs from framing lumber (rimboard for the stringers, OSB for the risers and treads), and eventually cover them with finishing treads and risers that match our floors.

More Unexpected Plumbing

Every time working on the house involves swinging a sledgehammer and generally banging on things, rust inside our terrible, terrible galvanized steel pipes flakes off into the water and clogs up the aerator on the faucets. When this happens the water faucets slow to a trickle. This means that nearly every time I have to swing a sledgehammer I have to then bring the pipe wrench up to the bathroom and kitchen faucets, take off the aerators and clean them out, removing the little flecks of rust. Then the faucets work fine again. At least, they did until yesterday.

Old faucet

Old faucet

I’d been dealing with the progressively worse faucet in the bathroom for about a week and finally cleaned out the aerator. Unfortunately, either loosening or tightening it back on resulted in an sudden flood of water under the sink and onto the floor. It’s a pedestal sink, which in this one case was a good thing because it meant I noticed the problem right away instead of after it had soaked things, but it was still a mess. Of course this was right after we had gotten back from a big trip to Menards, where I easily could have bought a faucet and it was late and Sarah was taking the car the next day.

After removing the faucet, which was rather a pain because the hoses connect up underneath the sink where there isn’t any room to work, I took it apart and confirmed that it wasn’t possible to repair it. The faucet is very cheap. It may not actually be that old, but it’s basically designed to leak at least some water, and not designed for the aerator to be regularly cleaned out. We ordered a new faucet for pick up in store from Home Depot.

We decided that Sarah could drop me off at Home Depot on her way out and I could take the bus home. I’ve taken the bus to Home Depot on a couple of other occasions and the timing worked out really well. I was worried that on a Sunday I’d have to wait a while, but the bus was there right as I came out of the store and I hopped on. The next one would have been 18 minutes later.

New faucet

New faucet

We can’t fix the tile that won’t come clean, but we can put in a nice new faucet. It’s WaterSense, which means in uses less water but more importantly for our purposes puts out a decent stream despite our poor water pressure. The idea is that we’ll re-use this faucet for the basement bathroom, along with a shower kit we bought years ago that’s still in the box. That limited us to brushed nickel, which was good because we didn’t really plan on designing our other bathrooms just yet. I’m excited because it’s single handle, which I think is easier to use.

Window Shopping


Front door

Front door

The first floor has what look like original windows. They’re single pane, wood framed, and while they were probably nice when they were new they leak heat like a sieve and they’re falling apart. The front door is a newer steel door, but it’s cheap, scratched and dented, it’s been kicked in at least once from the looks of it, and in typical fashion it was installed wrong. Plus it’s an 80″ door that was retrofitted into an 84″ opening. The original transom over it is visible from the inside but sided over on the outside. It’s all in need of an upgrade.

The process of shopping for new windows and doors started, as usual, with Google. I educated myself on panes, glazing, U-factors, R-values, SHGC, visual transmittance, aluminum, vinyl, fiberglass, wood cladding, air leakage, and more. I did research on companies, materials, methods, and pricing. We’re trying to make our house energy efficient, not just to save money but to conserve resources. That said, money inevitably comes into play with a lot of these calculations.

After learning about different window types, styles, and their respective properties, we started considering what we wanted. When it comes to resale, “new windows” is about as far as most prospective buyers go, so the prevailing wisdom is not to spend a ton on them. Resale isn’t our top priority, though. We want to build a house that will last, which means using quality materials. The second floor already has “new” windows, and they’re about as cheap as it gets. Most are single-hung vinyl from three different brands. They leak air and in some cases water, they were installed wrong, and they conduct heat badly. As a result we’re planning on replacing all of them when we redo the second floor, which seems like a waste, but even if they weren’t crappy windows most of them are damaged or the wrong size.

I settled on fiberglass frames because they’re stronger than vinyl and will hold up better. I didn’t want wood cladding because even good windows can condense if the indoor humidity gets too high, and when that happens wood-clad windows don’t hold up well. I also didn’t want aluminum frames because even with thermal breaks they generally don’t insulate as well. I discovered, not surprisingly, that high-end fiberglass windows with great efficiency are very expensive, to the point that they don’t make a lot of sense when you consider the money you save on energy versus what you spend on the windows.

If our house had a big window curtain wall, the window efficiency would make a lot more difference. As it is, we don’t have a ton of square footage of windows. We closed up the windows on the North wall, leaving about 185 square feet of window and doors on the first floor, or about 14% of the wall area. I narrowed my search to three reasonably priced fiberglass window manufacturers and started getting quotes. To minimize air loss I stuck with casements and awning-over-picture windows, though in the back we have a sliding glass door with transom and one double-hung because an open casement would block the stairs off the porch.

I initially focused on triple-pane windows. The third pane increases the glazing and reduces air convection within the window. They are notably more efficient than double pane windows and the first company I talked to said they only add about 10% to the cost. However, after I got a quote back from one of the other companies, the salesperson noted it would be considerably cheaper with double pane. I asked for a double pane quote and, at least from them, the price came down by 25%. That was enough to give me pause, so I went back and re-did my heat loss calculations. When I factored in the cost of energy (albeit at today’s prices), it would take over 50 years to recoup the price difference. While I expect energy prices to go up and the windows to last that long, it was still a tough sell.

The deciding factor was the front door. No one seemed to make an entry door that I liked, mostly since I’m really picky. Last year Sarah and I decided to add a consistent style to certain elements of the house, a theme if you will, of curved wrought iron, to the railings on the stairs and the front porch and to the glass on the front door, as well as other accents throughout the house. Not all of the door manufacturers had wrought iron styles that we liked. I’d also seen operable sidelites, where the windows adjacent to the door are screened and open to let in air, so you don’t have to have a screen door. I don’t like screen doors because they make it difficult to go through the door if you’re carrying things and they ruin the look of a front door, so I was immediately sold. Unfortunately only a few manufacturers sell them. Finally, most of the steel and fiberglass doors have a wood frame and the door itself is built with wood. It’s exposed to the elements and often looks bad inside of five years without regular repainting. Only a few had composite frames and steel door construction.

Iron Door

Iron Door

Then I stumbled across iron doors. Iron doors are relatively new on the consumer market. They combine a heavy gauge steel door and frame with wrought iron scrollwork. Best of all they have operable sidelites, they’re filled with polyurethane insulation and you can get Low-E glass so they’re fairly energy efficient, plus they look gorgeous. On top of that they’re extremely secure. The drawbacks were two-fold: very few have a thermal break and all of them are expensive.

The thermal break issue is that the door and frame are made with solid steel tubing, so heat is conducted through the metal despite the insulation inside. This can lead to condensation if there’s enough humidity and temperature difference, not to mention heat loss. I found a couple of companies offering thermal breaks in their iron doors, but they were prohibitively expensive (think new sub-compact car), which only exasperated the second problem. After scouring the Internet for a reasonably priced solution, I finally gave up on the thermal break.

The price difference for the iron door over a regular fiberglass or steel door was about the same as the price difference between the double and triple pane windows. A door we really love, that makes a strong first impression to visitors, plus adds resale value to the house versus an up to fifty-year payback in energy efficiency from triple pane windows was a fairly easy choice. We decided on double pane fiberglass windows from Inline Fiberglass and an iron door from Donatello Doors. It will take six to twelve weeks to get them made and delivered and then we’ll still need time to install them, so we’re ordering now.