Month: August 2013

Drain Cap Mishap

Fernco Cap

Fernco Cap

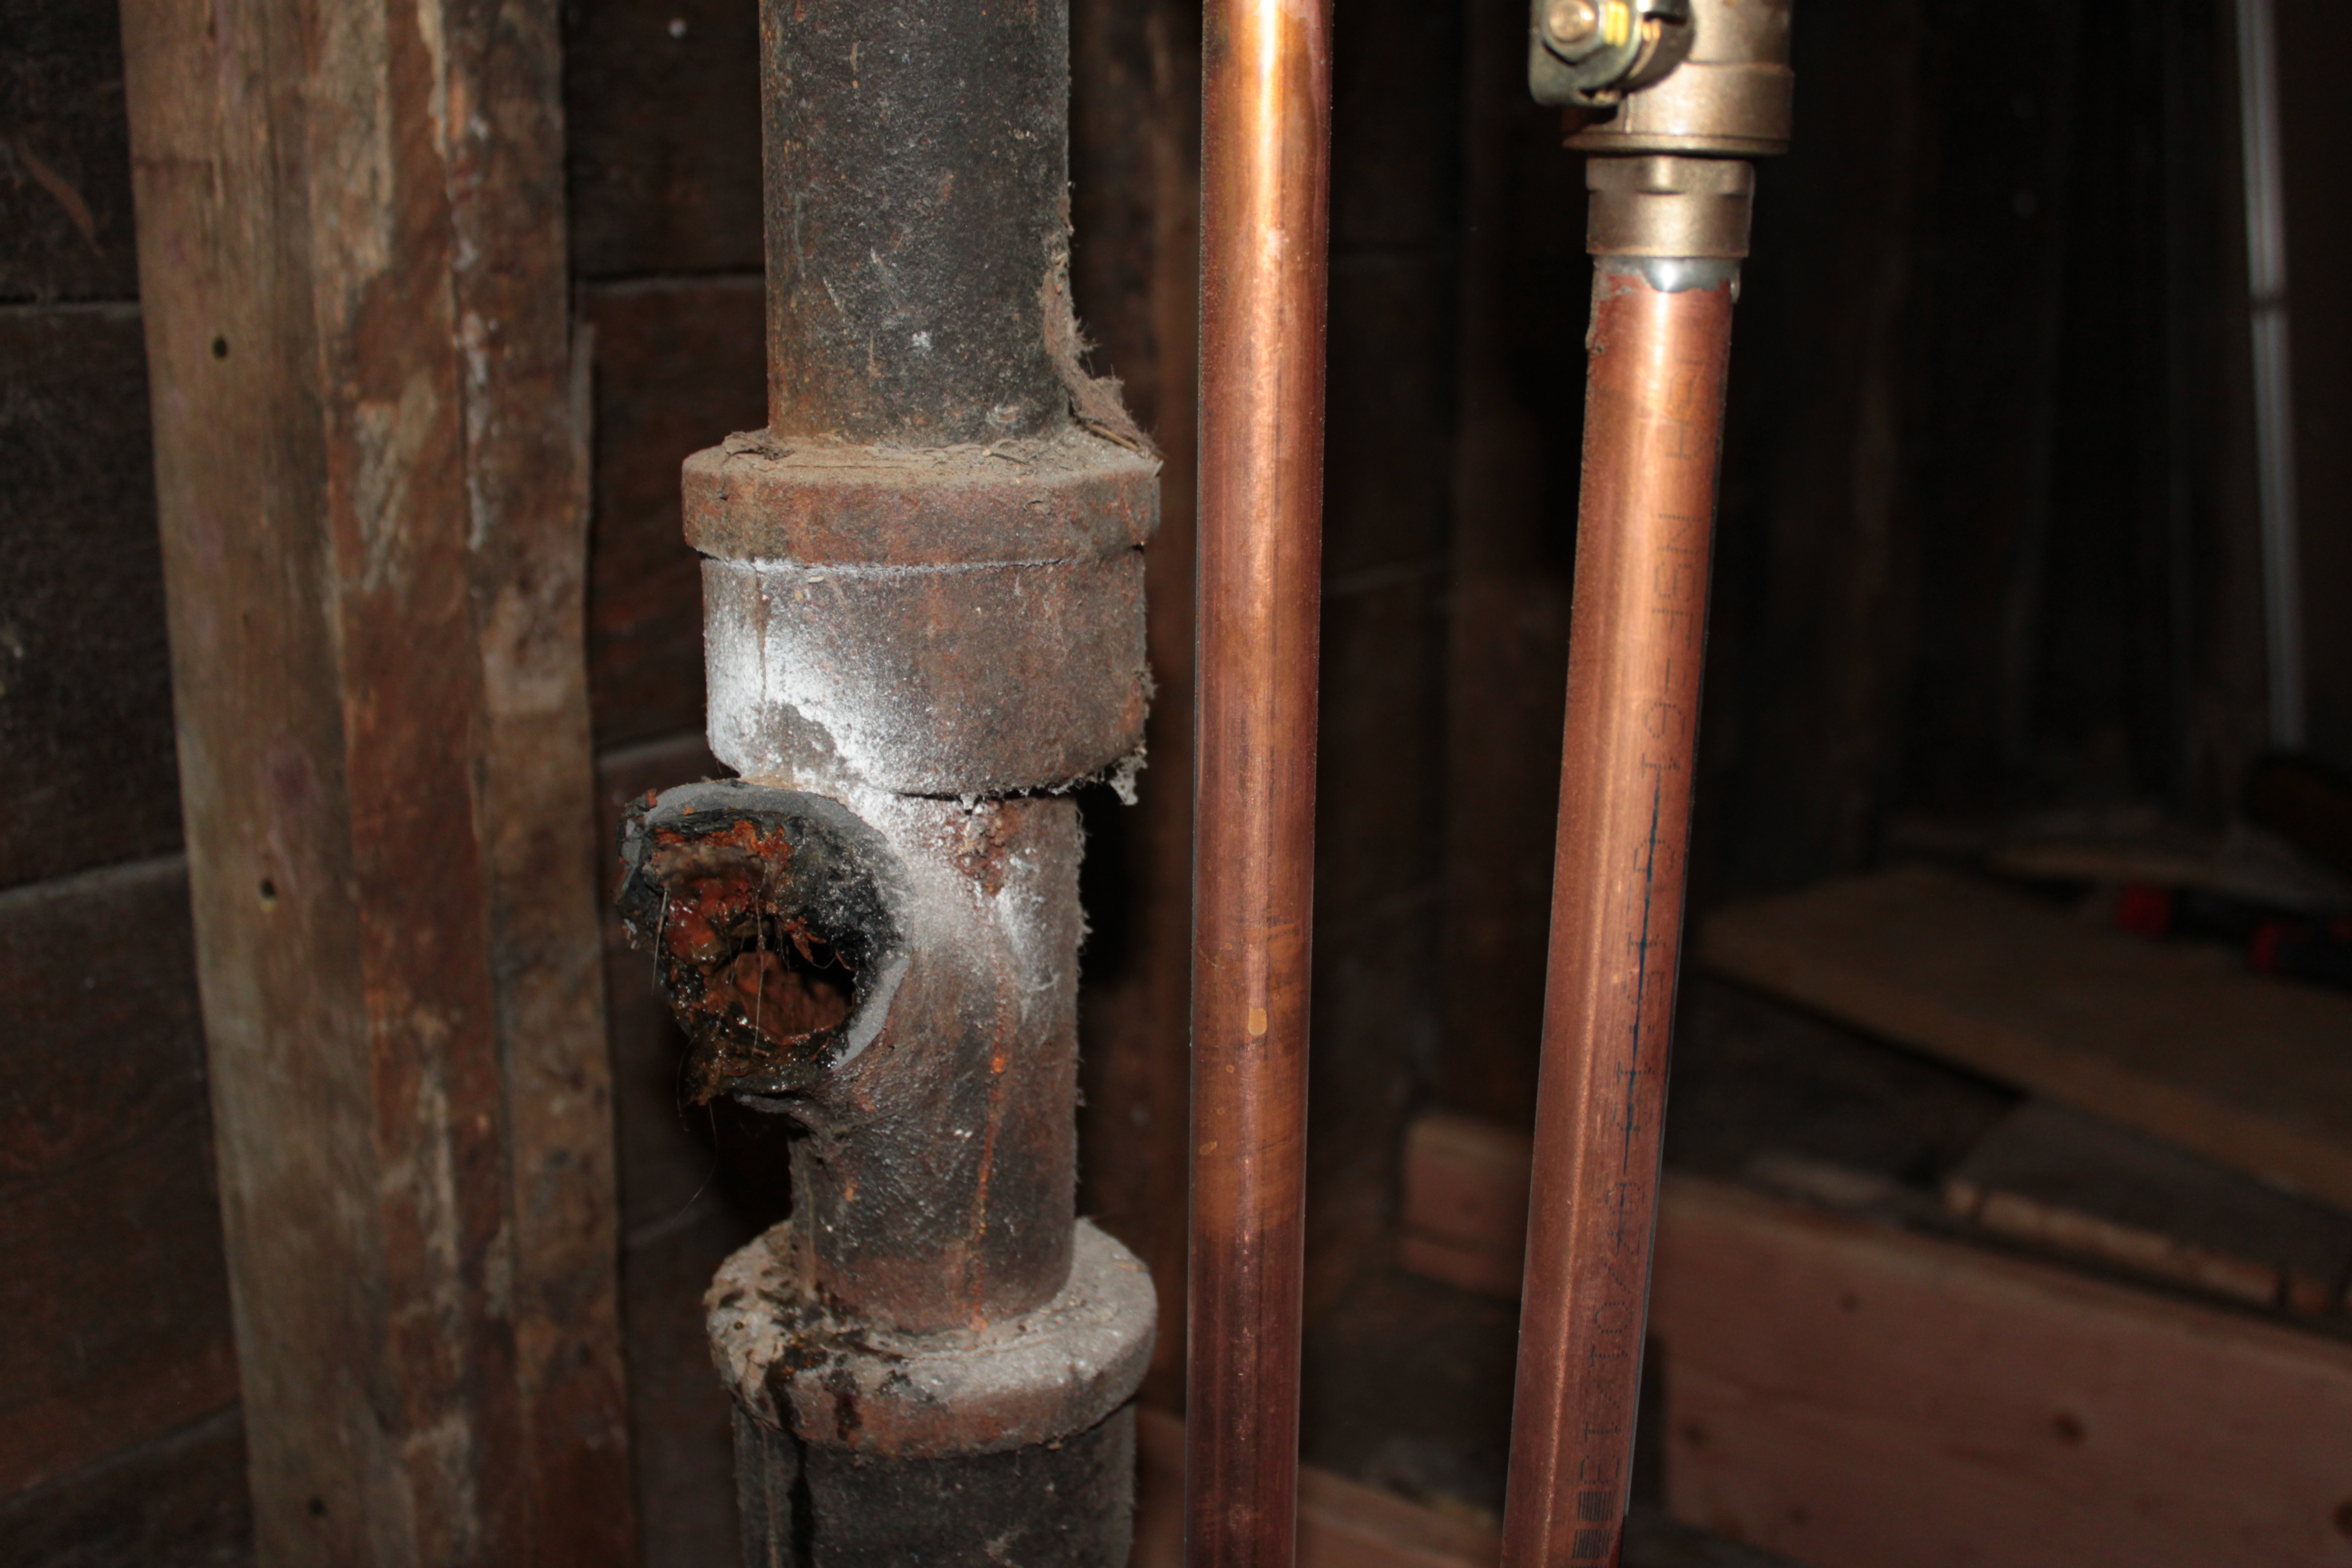
When I demo’d the wet wall, I cut off the tee of the soil stack for the first floor bathroom drains. It was a 4″ cast iron pipe. I cut it because it was notched into a completely rotted floor joist. I wanted to replace the joist, and since there wasn’t going to be a drain there it didn’t make sense to notch the new joist. I had picked up a 4″ rubber pipe cap from Home Depot, assuming it would fit.

Of course, it didn’t fit because it was meant for 4″ pipe, not the fitting that 4″ pipe fits into, which has a noticeably larger diameter. For the time being I put the test plug back in. I went back to Home Depot for some other things and discovered they didn’t carry the larger size, because it’s not a common diameter. Menards, however, carried it as a special order with free shipping, which made it cheaper than most of the other online sources for it. I placed my order and got back to work.

As I discussed in my post about our latest run-in with unexpected plumbing, we couldn’t finish the joist repairs on Saturday because we were still waiting on the cap. Scheduled delivery was Monday. Monday I worked from home and waited expectantly for UPS to deliver the cap. Hours ticked by, the mail came, the evening came, but no UPS. I checked the tracking and they said they had delivered it, leaving it by the garage. That was strange. Why would they walk all the way into the back yard and leave it there, especially when there were people home? Nonetheless I searched the back yard, all around the garage, re-checked the front porch and anywhere else I thought they might leave a package, and found nothing.

Frustrated, I went back to the tracking page. It had been delivered to Hebron, Illinois. For a moment I was thoroughly confused. How on Earth would it have wound up- and then it hit me: our friends Mike and Steph lived in Hebron. I had ordered Mike a Menards gift card as a thank you when he helped us put in the footings in the basement. Menards had helpfully saved the address and somehow left it as the default. When I ordered the part I didn’t check the shipping address and sent the drain cap to them. To be clear, Mike and Steph’s house is 70 miles from ours, so getting it from them is non-trivial.

The unfortunate part of this is that I need this drain cap before I can put the joist in because there is quite literally no clearance to put it in later. As it is the joist may have to bend slightly around the drain (still better than a giant hole notched in it). I need the joist in place so I can put in the subfloor, and I need the subfloor so I can re-frame the wet wall. I need to re-frame the wet wall so Lester can run the plumbing for the radiators and install the boiler, so we can have heat this winter. I took off Thursday and Friday of this week in anticipation of getting this work done. I need this drain cap!

The good news is that I found out Grainger stocks the part in Franklin Park, which is quite a bit closer than the alternatives. I’ll pick it up tomorrow morning and when I eventually get the other one from Mike and Steph I can just return it to Menards.

Update: Further Mishaps

I drove to Grainger and picked up the drain cap yesterday morning. When I got home I discovered it too, did not fit. Where the other cap was too small, this was too big. More than that, the slope of the tee meant that a cap was really ill-suited to the task because it didn’t have a straight edge to clamp to. I went back to Home Depot and looked around until I found a Fernco 4″ to 2″ reducing plug. Then I got a 1 ½” cap that fit into the 2″ opening. Ugly, but effective, and it fits into the hole rather than over it. It took me multiple attempts and a lot of pounding with a rubber mallet, but I managed to get it installed and the joist in place.

Unexpected Plumbing, Part 3

Saturday we had a bit of a whoops. We had been working on sistering floor joists as part of the wet wall reframe, and hit a stopping point due to an ordered part not being in yet. It was getting into the evening and we had dinner plans at seven. I figured one quick last thing before we wrapped up would be to install a plug in the smaller drain, where the first floor kitchen sink had originally been.

Drain with tee and elbow

Drain with tee and elbow

It was as simple as unscrewing the existing galvanized line from the cast elbow and putting in the plug. I braced the pipe while Mike unscrewed with the pipe wrench. We first started turning it at the tee, but the pipe wouldn’t clear the floor, so we decided to loosen it at the elbow first. That’s when the tee abruptly cracked.

Broken tee

Broken tee

Crap. The cast iron was completely rotted, most likely due to people putting the wrong stuff down the kitchen sink for too many years. Now we had a dilemma. We needed to fix it quickly, and I didn’t have a coupling for the PVC pipe that the cast iron transitioned to directly below the tee. I did, however, have a brand new, 10′ length of PVC left over from the water heater venting. We measured and realized that not only would it fit, we could also resolve a long standing issue in the basement. The 2″ PVC drain went directly into a 3″ PVC drain in the floor that was cracked. It also had several capped branches on it, all of which could be eliminated.

Basement connection

Basement connection

Check out that beauty! They had put on a side drain for the tub, another side port that required water to travel up for the basement kitchen sink, and the gap where the smaller pipe went into the bigger one was filled with Great Stuff foam that bubbled out every time we ran the dishwasher. Mike ran to the hardware store to buy a reducing coupling and I cut off both the cast iron tee and the top of the 3″ PVC pipe, pulling out all of the existing PVC.

Much better!

Much better!

Mike got back and we installed the reducing couple and fitted in the new 10′ PVC pipe. With a few inches cut off at the top, we reused the rubber couple to join it back to the cast iron going up to the upstairs kitchen sink.

Rubber couple

Rubber couple

Despite my warnings not to use the sink, Sarah managed to run the kitchen faucet while I was standing under the open pipe and then later poured out part of a 2-liter of pop (fortunately I wasn’t under it the second time). She apologized for forgetting and said she was just hungry. We did make it to dinner, albeit a little late; the sushi was really good!

Wet Wall Demo

Keeping in mind our current focus of having heat this winter, we need to re-frame the wet wall so that Lester, our radiant heating installer, can run the radiant plumbing up to the second floor, where we’ll be installing two new radiators. That means we have to take the old wall out.

Wet wall before

Wet wall before

The first step in this process was to remove the old toilet flange where the original bathroom was and replace the rotted floor joist. In the process I realized that the 6″ x 8″ rim joist along the outside wall below where the bathtub had been was completely rotted as well. Fortunately I saved the old center beam and columns from the basement, which are the same size, so I can cut a replacement piece to fit.

Toilet flange and rotted joist

Toilet flange and rotted joist

After trying a rented snap cutter, I wound up using carbide blades on a reciprocating saw to cut off the old cast iron drain and cap it. I also used the reciprocating saw to cut off the unused vent pipe. At some point over the years the original (correct) drain venting had been disconnected in favor of just wet-venting through the soil stack. This is less of a problem now that we’ve gotten rid of the first floor connections. We’ll come back and replace all the above-ground cast iron with PVC and put in proper venting at the same time.

Wet wall removed

Wet wall removed

I cut back the floor boards so I could get the rotted joist out and then took out the remaining studs, which by this point were hanging from the ceiling. At this point the only semblance of a wet wall was the two drain pipes, the two supply plumbing pipes, and the gas line. I need to cut back the subfloor a bit more to fit in the new OSB.

I spent some time planning out the wet wall, including where plumbing would go. The challenge is toilet drains, since I don’t want to notch joists. I realized that when we do the second floor I’ll need to replace two of the joists with engineered I-Joists so that we can cut 4″ holes in them. I also need to put in some 16″ O.C. blocking to support the wet wall, since it doesn’t line up with an existing joist. Instead it lines up with the PSL column we put in, which sits between two joists.

The plan is to get this done this weekend. I’ll pick up the lumber tonight and hopefully get the subfloor done tomorrow and the wall framing done on Sunday.

Mechanical Room Panel

We finished the first half of the mechanical room panel last weekend, which includes the water filter and heater and a space the future boiler will occupy. The second half of the panel will hold the manifold, pump, and expansion tank for the radiant heating system. I couldn’t build it until the old water heaters were out which, predictably, required the new water heater.

Before

Before

Tuesday morning, Sarah’s dad Mike and I got the two old water heaters disconnected and moved over to the scrap pile. Then we marked out the location of the studs to attach to the wall. After the door delivery, he and Dean ground the brick wall smooth with angle grinders while I cut the lumber to size. I finished grinding down the wall Wednesday and put up the framing. I put sill gasket behind each stud to prevent moisture from seeping into the wood and attached them with Tapcon screws. I found that in several cases the screws wouldn’t go all the way in, despite using an air compressor and vacuum to remove dust and re-drilling the hole several times.

After

After

I discovered the best solution was to drill the holes as I had been with the rotary hammer, then come back and re-drill the holes with the drill bit that came with the screws. Even though they were both 5/32″, something about the included bit worked better. With everything in place, I came back down after dinner and filled the cavities with spray foam. I just need to cut back any places the foam expanded past the front of the framing and it will be ready for Lester to install the manifold panel.

Spray foamed panel

Spray foamed panel

The only remaining item on my mechanical room preparations (aside from cleaning up the huge mess I’ve made) is to run a short length of EMT conduit from the junction box over to the panel and fish a 15 amp circuit for the radiant system.

Door Delivery

We got word that our Iron front door was finally on its way. It was manufactured in China, so getting here was a bit of a process. The delivery company confirmed my fears though: they only deliver during the day on weekdays, and it weighs 930 lbs! Worst of all there was very little notice as to what day it would be. They called on Friday and it was delivered on Tuesday. Dean offered to take the afternoon off work and Sarah put out the call on Facebook for help, and Laurie, Jade, and Cody came to rescue, along with both of Sarah’s parents. On top of the door delivery, Sarah had a huge final paper due Tuesday that she was scrambling to finish.

Curbside delivery

Curbside delivery

The delivery window was noon to two, and at five to noon the truck showed up. It wouldn’t fit on a pallet jack, so we manhandled it onto the lift gate and got it down to the street. Once we had it slid to the side of the street the truck was gone and we were left to deal with how to get it into the house.

Door inside

Door inside

The door itself was wrapped separately from the frame with sidelights, so first we got that into the house. It was heavy, but not terrifically so, and it went relatively smoothly. We figured this process wasn’t going to be so bad after all. I called Dean and told him not to worry about leaving work. Then I went to move the frame… it weighs everything.

I called Dean to ask if he could come after all. While we waited for him to get there we ate lunch and we debated the best method to move it. I broke out the furniture-mover robots (the plastic things that slide easily) and Mike employed some leverage with 2x4s to get the frame up on the curb. We decided to move it to the stairs still on the steel pallet, since the door has brackets that stick out.

Dean arrived and with much heaving, shoving, pulling, and shouting, the door frame slowly worked its way to the porch, up the stairs, and into the house. Once again, friends and family came through!

Frame inside

Frame inside

We thanked everyone profusely, and Dean and Mike even stayed to work on grinding down the wall in the basement for the second half of the mechanical room panel. Also, Sarah got her paper turned in on time.

Mike and Dean grinding

Mike and Dean grinding

We can’t wait to get it installed, but there are a few things we need to do before then. At this point, just turning the frame upright seems like a serious challenge, let alone putting it into the wall. We’ll get there eventually. Our goal is to get the door and windows installed before the weather gets too cold.