Tag: cast iron

Unexpected Plumbing, Yet Again

At some point I guess we should just expect unexpected plumbing to happen. However, I can say with certainty that we didn’t expect a loud thud followed by a cascading shower of water from the mechanical room ceiling one fine Saturday evening. We’d just gotten the kids into bed and Sarah was doing dishes when it happened. I came running from the living room (one of us has to sit watch so the kids stay in bed and go to sleep) and she was already pointing me out the back door and upstairs.

Cast iron pipe dropped

When we got upstairs we saw what had happened: one of the three cast iron soil and vent stacks in the wet wall had basically fallen straight down about two feet. The straps holding it in place were both snapped, the top of the stack was in the attic instead of sticking through the roof, and most critically, the PVC pipe it connected to at the bottom (where the washing machine drains) had cracked at the main stack and the waste water from the washing machine had poured out of the broken pipe end into the basement from above.
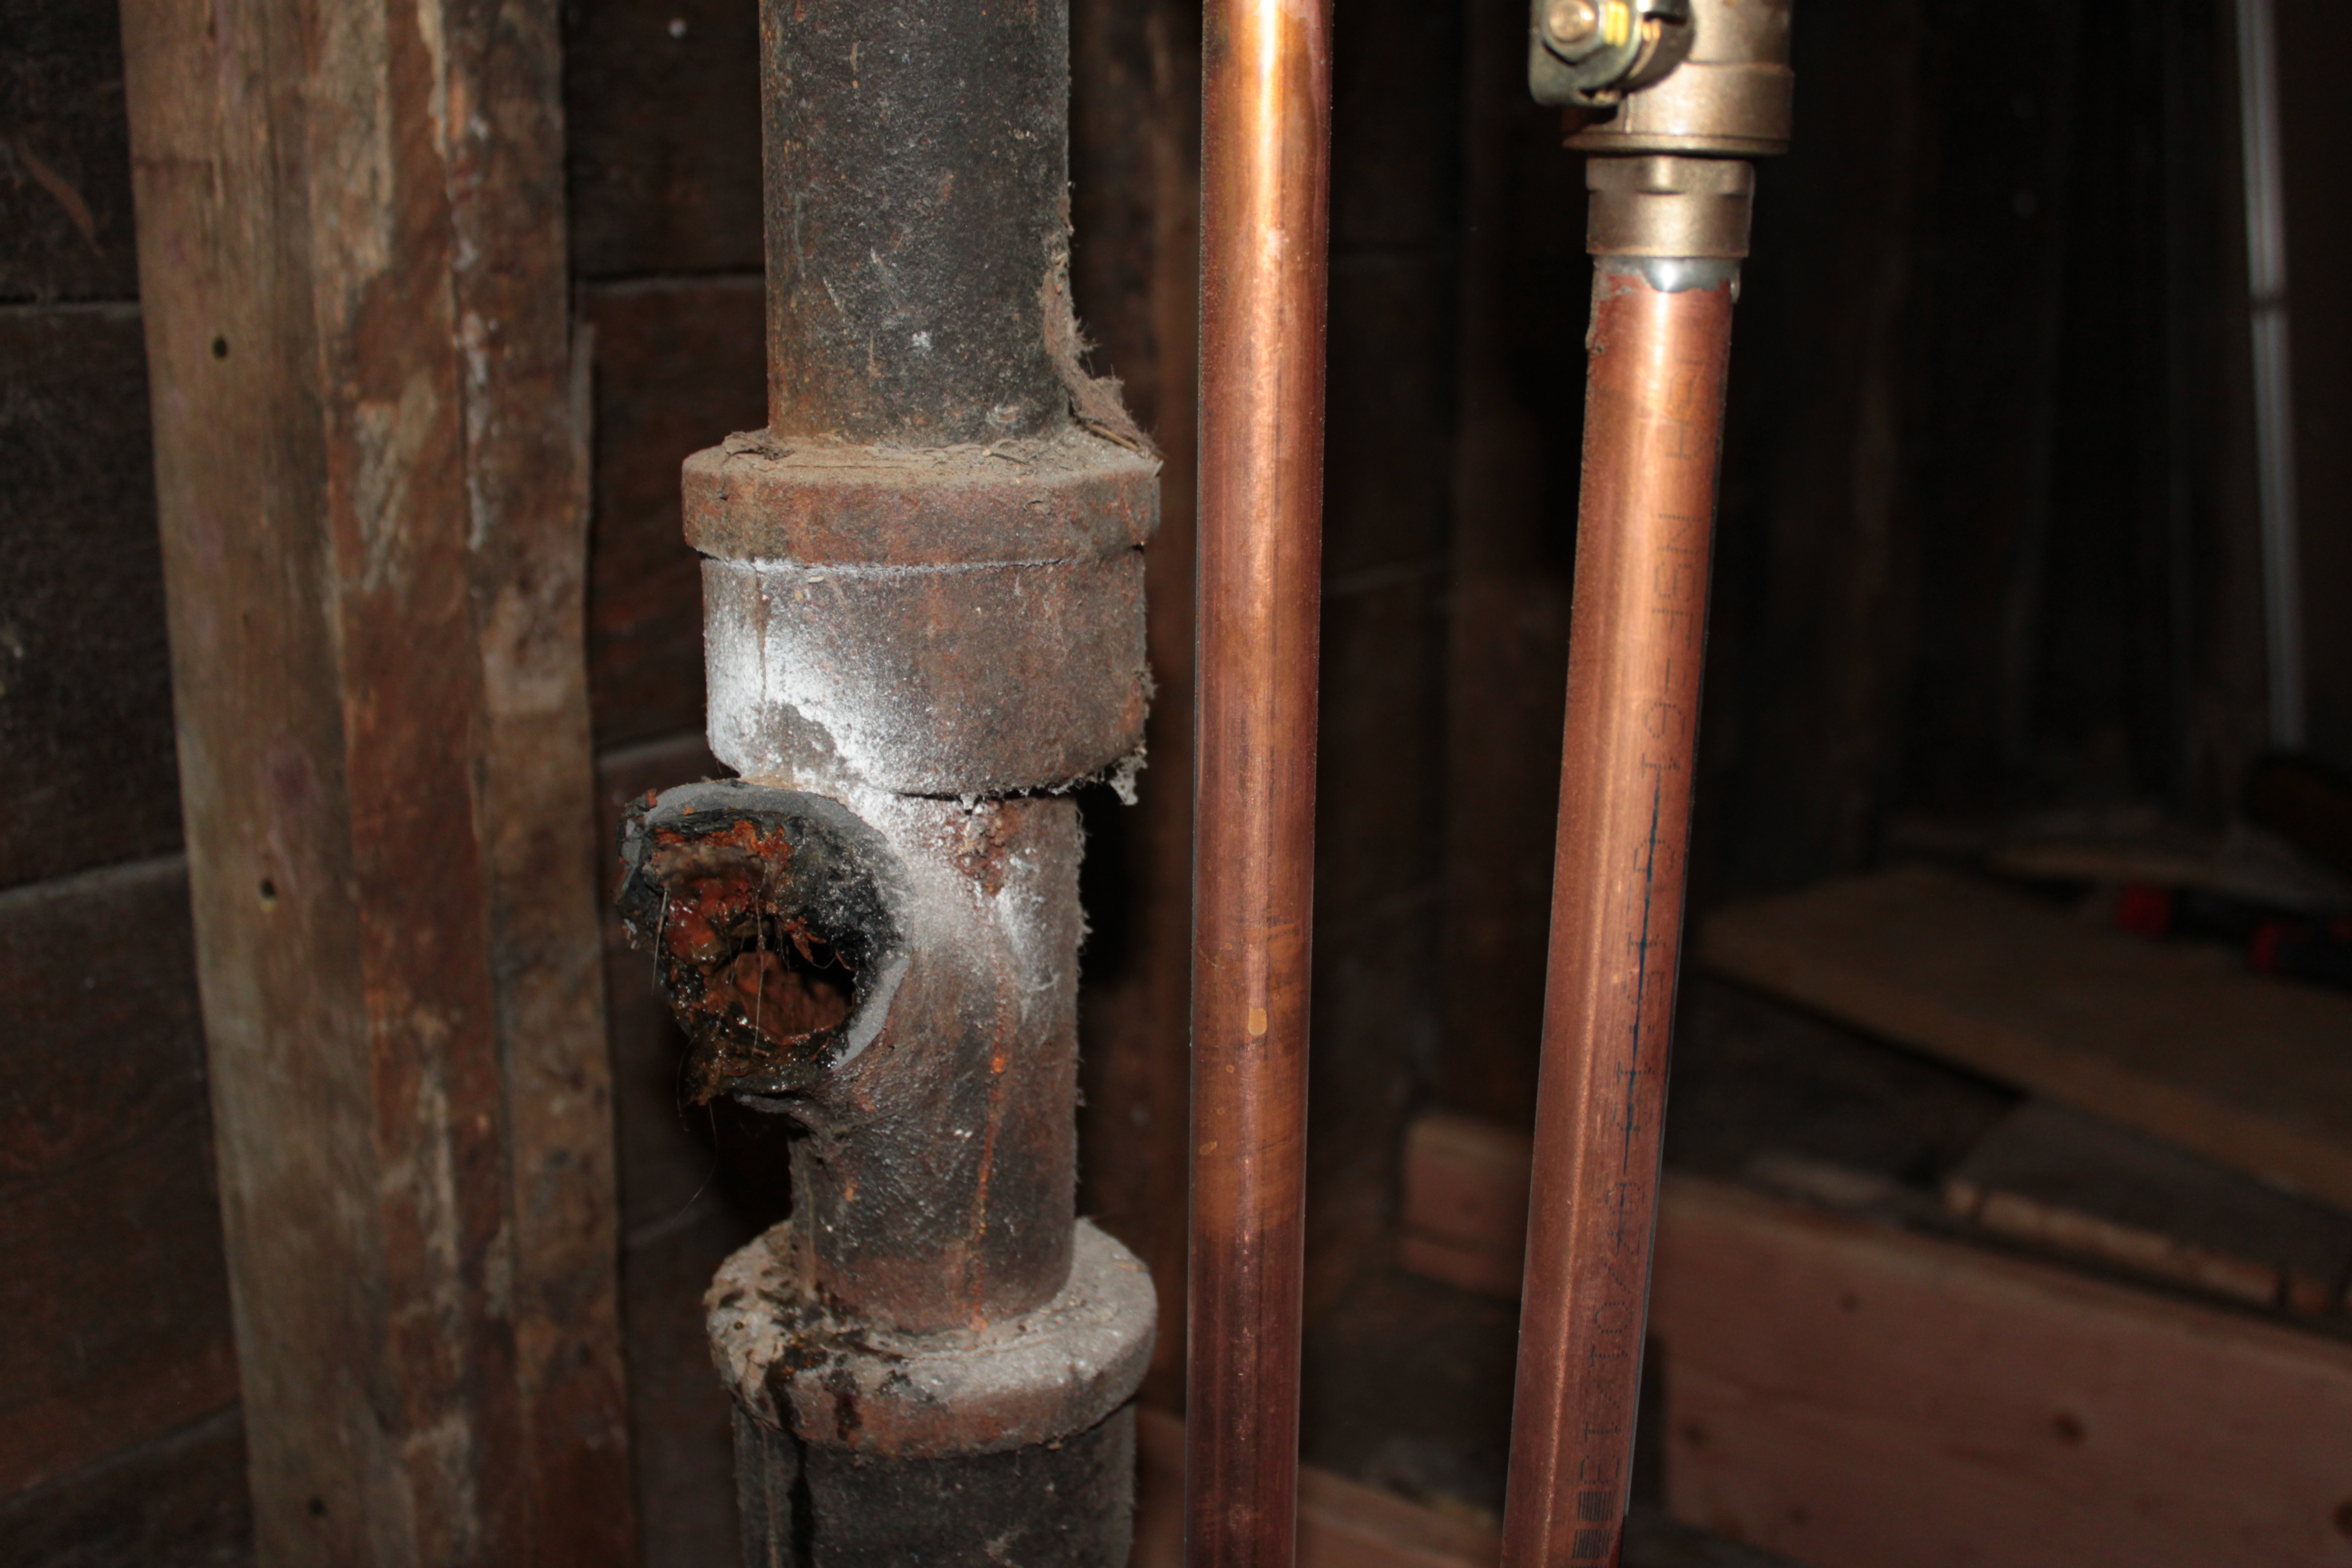
Broken fitting

The good news is that there wasn’t any serious damage. The 2″ cast iron pipe was already slated to be removed, nothing in the mechanical room that got wet was harmed, and the PVC section connecting the washer was temporary. We turned off the washer and went to bed, leaving the problem for the next day.

Vent stack dropped out of roof

Sunday morning I started by removing the cast iron pipe. This drain used to be used by the kitchen drains from the first and second floors. Apparently, it had been supported by the plaster and lath of the walls, and with only the straps (and the PVC pipe underneath) holding it up, it simply gave way. The bad news was that the PVC had cracked at a fitting, right before it went into the main stack, so I had two options: use a heat gun, some pliers and about an hour to pry the remains of the fitting out and try to re-use the Tee, or cut out the 4″ PVC stack section and put in a new one. That seemed easier, so I ran to the store and got some supplies, including a 10′ section of 4″ pipe.

Pipe removed

I managed some Three-Stooges-level incompetence when it came to removing the old PVC pipe section, spilling the remaining water inside at several opportunities before finally getting the rest into a bucket and the pipe out of the wall…before knocking over the bucket on the floor. I did my best to clean up the new mess on the subfloor and Sarah put down even more towels in the mechanical room below. I put together a new branch for the washing machine and glued it together with minimal fuss.

Roof penetration

The final step was to patch the hole in the roof. When I got up on a ladder in the second floor and took a look, I found the expected congealed tar, but also some bent aluminum flashing. Because I didn’t want to get onto the roof and do a more extensive repair, I simply put some flashing tape over the aluminum cylinder from within.The roof (and walls) already leak, so it doesn’t need to be perfect at this point. We’ll be putting on a new roof in the not-too-distant future and it’s Good Enough™ for now.

Drain Cap Mishap

Fernco Cap

Fernco Cap

When I demo’d the wet wall, I cut off the tee of the soil stack for the first floor bathroom drains. It was a 4″ cast iron pipe. I cut it because it was notched into a completely rotted floor joist. I wanted to replace the joist, and since there wasn’t going to be a drain there it didn’t make sense to notch the new joist. I had picked up a 4″ rubber pipe cap from Home Depot, assuming it would fit.

Of course, it didn’t fit because it was meant for 4″ pipe, not the fitting that 4″ pipe fits into, which has a noticeably larger diameter. For the time being I put the test plug back in. I went back to Home Depot for some other things and discovered they didn’t carry the larger size, because it’s not a common diameter. Menards, however, carried it as a special order with free shipping, which made it cheaper than most of the other online sources for it. I placed my order and got back to work.

As I discussed in my post about our latest run-in with unexpected plumbing, we couldn’t finish the joist repairs on Saturday because we were still waiting on the cap. Scheduled delivery was Monday. Monday I worked from home and waited expectantly for UPS to deliver the cap. Hours ticked by, the mail came, the evening came, but no UPS. I checked the tracking and they said they had delivered it, leaving it by the garage. That was strange. Why would they walk all the way into the back yard and leave it there, especially when there were people home? Nonetheless I searched the back yard, all around the garage, re-checked the front porch and anywhere else I thought they might leave a package, and found nothing.

Frustrated, I went back to the tracking page. It had been delivered to Hebron, Illinois. For a moment I was thoroughly confused. How on Earth would it have wound up- and then it hit me: our friends Mike and Steph lived in Hebron. I had ordered Mike a Menards gift card as a thank you when he helped us put in the footings in the basement. Menards had helpfully saved the address and somehow left it as the default. When I ordered the part I didn’t check the shipping address and sent the drain cap to them. To be clear, Mike and Steph’s house is 70 miles from ours, so getting it from them is non-trivial.

The unfortunate part of this is that I need this drain cap before I can put the joist in because there is quite literally no clearance to put it in later. As it is the joist may have to bend slightly around the drain (still better than a giant hole notched in it). I need the joist in place so I can put in the subfloor, and I need the subfloor so I can re-frame the wet wall. I need to re-frame the wet wall so Lester can run the plumbing for the radiators and install the boiler, so we can have heat this winter. I took off Thursday and Friday of this week in anticipation of getting this work done. I need this drain cap!

The good news is that I found out Grainger stocks the part in Franklin Park, which is quite a bit closer than the alternatives. I’ll pick it up tomorrow morning and when I eventually get the other one from Mike and Steph I can just return it to Menards.

Update: Further Mishaps

I drove to Grainger and picked up the drain cap yesterday morning. When I got home I discovered it too, did not fit. Where the other cap was too small, this was too big. More than that, the slope of the tee meant that a cap was really ill-suited to the task because it didn’t have a straight edge to clamp to. I went back to Home Depot and looked around until I found a Fernco 4″ to 2″ reducing plug. Then I got a 1 ½” cap that fit into the 2″ opening. Ugly, but effective, and it fits into the hole rather than over it. It took me multiple attempts and a lot of pounding with a rubber mallet, but I managed to get it installed and the joist in place.

Unexpected Plumbing, Part 3

Saturday we had a bit of a whoops. We had been working on sistering floor joists as part of the wet wall reframe, and hit a stopping point due to an ordered part not being in yet. It was getting into the evening and we had dinner plans at seven. I figured one quick last thing before we wrapped up would be to install a plug in the smaller drain, where the first floor kitchen sink had originally been.

Drain with tee and elbow

Drain with tee and elbow

It was as simple as unscrewing the existing galvanized line from the cast elbow and putting in the plug. I braced the pipe while Mike unscrewed with the pipe wrench. We first started turning it at the tee, but the pipe wouldn’t clear the floor, so we decided to loosen it at the elbow first. That’s when the tee abruptly cracked.

Broken tee

Broken tee

Crap. The cast iron was completely rotted, most likely due to people putting the wrong stuff down the kitchen sink for too many years. Now we had a dilemma. We needed to fix it quickly, and I didn’t have a coupling for the PVC pipe that the cast iron transitioned to directly below the tee. I did, however, have a brand new, 10′ length of PVC left over from the water heater venting. We measured and realized that not only would it fit, we could also resolve a long standing issue in the basement. The 2″ PVC drain went directly into a 3″ PVC drain in the floor that was cracked. It also had several capped branches on it, all of which could be eliminated.

Basement connection

Basement connection

Check out that beauty! They had put on a side drain for the tub, another side port that required water to travel up for the basement kitchen sink, and the gap where the smaller pipe went into the bigger one was filled with Great Stuff foam that bubbled out every time we ran the dishwasher. Mike ran to the hardware store to buy a reducing coupling and I cut off both the cast iron tee and the top of the 3″ PVC pipe, pulling out all of the existing PVC.

Much better!

Much better!

Mike got back and we installed the reducing couple and fitted in the new 10′ PVC pipe. With a few inches cut off at the top, we reused the rubber couple to join it back to the cast iron going up to the upstairs kitchen sink.

Rubber couple

Rubber couple

Despite my warnings not to use the sink, Sarah managed to run the kitchen faucet while I was standing under the open pipe and then later poured out part of a 2-liter of pop (fortunately I wasn’t under it the second time). She apologized for forgetting and said she was just hungry. We did make it to dinner, albeit a little late; the sushi was really good!

Wet Wall Demo

Keeping in mind our current focus of having heat this winter, we need to re-frame the wet wall so that Lester, our radiant heating installer, can run the radiant plumbing up to the second floor, where we’ll be installing two new radiators. That means we have to take the old wall out.

Wet wall before

Wet wall before

The first step in this process was to remove the old toilet flange where the original bathroom was and replace the rotted floor joist. In the process I realized that the 6″ x 8″ rim joist along the outside wall below where the bathtub had been was completely rotted as well. Fortunately I saved the old center beam and columns from the basement, which are the same size, so I can cut a replacement piece to fit.

Toilet flange and rotted joist

Toilet flange and rotted joist

After trying a rented snap cutter, I wound up using carbide blades on a reciprocating saw to cut off the old cast iron drain and cap it. I also used the reciprocating saw to cut off the unused vent pipe. At some point over the years the original (correct) drain venting had been disconnected in favor of just wet-venting through the soil stack. This is less of a problem now that we’ve gotten rid of the first floor connections. We’ll come back and replace all the above-ground cast iron with PVC and put in proper venting at the same time.

Wet wall removed

Wet wall removed

I cut back the floor boards so I could get the rotted joist out and then took out the remaining studs, which by this point were hanging from the ceiling. At this point the only semblance of a wet wall was the two drain pipes, the two supply plumbing pipes, and the gas line. I need to cut back the subfloor a bit more to fit in the new OSB.

I spent some time planning out the wet wall, including where plumbing would go. The challenge is toilet drains, since I don’t want to notch joists. I realized that when we do the second floor I’ll need to replace two of the joists with engineered I-Joists so that we can cut 4″ holes in them. I also need to put in some 16″ O.C. blocking to support the wet wall, since it doesn’t line up with an existing joist. Instead it lines up with the PSL column we put in, which sits between two joists.

The plan is to get this done this weekend. I’ll pick up the lumber tonight and hopefully get the subfloor done tomorrow and the wall framing done on Sunday.